Note!
Ulla Bra is renewed and her new name is Ulla Sport Bra. Its sewing technique differs significally from the old one so you should follow the sewing instructions coming with the pattern.Sewing Instructions for the “Old” Ulla Bra
valid until 7/19
 THE CUP
Prepare the foam cup lining
Make The Cup Cover
Attach the Cup Cover to the Lining
THE BAND
Attach the lower elastic to the band
Attach the cups to the band
Enclose the Lower Elastic
Attach The Side Boning
Attach The Upper Edge Elastic
THE BACK
Bra back and straps
Attach the back closure
The cup cover fabrics can be used freely because you don’t have to worry about the grainlines or stretch directions at all. Also, the foam lining pieces can be laid and cut using the fabric efficiently, except because the foam has a bit mechanical stretch in it, you will get extra support if you lay ”holding” pieces (i.e. strap piece) in the direction of the smallest stretch.
The Cup
Prepare the Foam Lining

Place the foam lining pattern pieces onto a single layer of the foam. Use a few pieces of tape to keep the pattern in place while cutting. Cut the pieces using either a rotary cutter or scissors.
Mark the matching notches with pins.
Seams 1 and 3
Hold foam lining pieces 2 and 3 together so the cut edges are touching, but do not overlap each other. Sew together using a zigzag stitch, making sure the zigzag stitch is wide enough to catch both pieces and the edges of the foam pieces are centered within the zigzag stitch. Feed the pieces evenly into the sewing machine. Backstitch at the start and end of the seam.
Seams 2 and 4
Sew foam lining piece 1 (upper piece) to foam lining pieces 2 and 3, once again positioning the pieces so the cut edges are touching but do not overlap. Sew together using a zigzag stitch as described above. To preserve the shape of the cup make sure foam lining piece 1 aligns with foam lining piece 2 at the center front edge, and the notch marked on the bottom of foam lining piece 1 aligns with the seamline of foam lining pieces 2 and 3. Backstitch at the start and end of the seam.
Seam 5
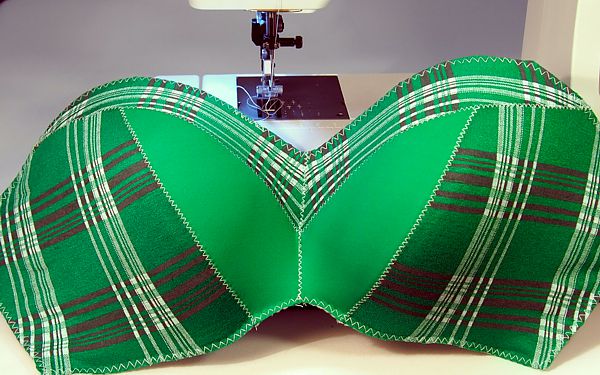
Sew the right and left cup together at the center front using a zigzag stitch.
Time to fit the bra on!
Attach the wings (made of any surplus fabric) to the sideseams using very long straight stitch.
Pin the straps in place and tie the wings.

Place the nylon stabilizer piece on the inside of the cup, lining it up against the cut edge of the foam lining. Stitch it onto the foam lining using a zigzag stitch.
Make The Cup Cover


Sew cup cover pieces 2 and 3 together using a 3mm straight stitch. Press open the seam allowances and topstitch in place. You can topstitch using a small, narrow zigzag stitch or by sewing a straight stitch 3mm (1/8″) on either side of the seamline. Trim away the seam allowances close to the stitching.
Sew cup cover piece 1 to cup pieces 2 and 3 using a 3mm straight stitch. Press open the seam allowance and topstitch in place. Trim away the seam allowances close to the stitching.
Attach the Cup Cover to the Lining

Determine the position of the center front seam
Starting from the center of one cup, pin one of the cup covers to the foam lining. Stretch the cup cover gently in the direction of the seamline(s) and pin the cover to the foam lining at the start and end of each seam. When the seamline is smoothly in place you can continue positioning the cover with a few pins by gently stretching the fabric evenly in all directions, making sure not to pull or collapse the foam lining in the process. Continue pinning the cup cover along the outer edges to the foam lining. The more stretch your cup fabric has, the more excess fabric there will be along the outside edge. Using the center seam of the foam lining as a guide, mark the center front of the cup cover fabric with pins. Take off the cup cover fabric.
Sew the cup covers together at the center front along the line you marked with pins. Topstitch, then trim the seam llowances close to the stitching. Pin the center front seam of the cup cover to the center front of the foam lining. Gently stretch and pin the cup cover onto the foam lining as described earlier.
Stitch the cup cover to the outer edge of the foam lining using a zigzag stitch. Trim away any excess cup cover fabric.
The Band
Attach the lower elastic to the band

Measure the bottom edge of the band. Cut a 3cm (1 1/8″) wide elastic to this length. Fold the elastic in half and mark at the fold. Starting from the center front, place the elastic onto the wrong side of the band along the lower edge. Center the pins on the elastic so you can leave them in place while stitching. Attach the elastic to the band along both the lower and upper edge using a zigzag stitch.
Attach the cups to the band
With the cups facing upward, sew the cups to the band using a straight stitch. Stretch and pin the band onto the lower edge of the cups, evenly distributing the fabric. Stretch the side of the band as well to match the side of the cup while sewing.
You can either start stitching from the right side seam, continue along the bottom of the cups, then continue up the left side seam (from armpit to armpit at one go).
Or, you can attach the bottom of the cups first, then continue stitching each side seam separately. The choice is yours.
Enclose the Lower Elastic

Fold the lower edge elastic of the band over the seam joining cups and the band. Working from the wrong side of the bra, stitch the elastic in place along the upper edge using a zigzag stitch.
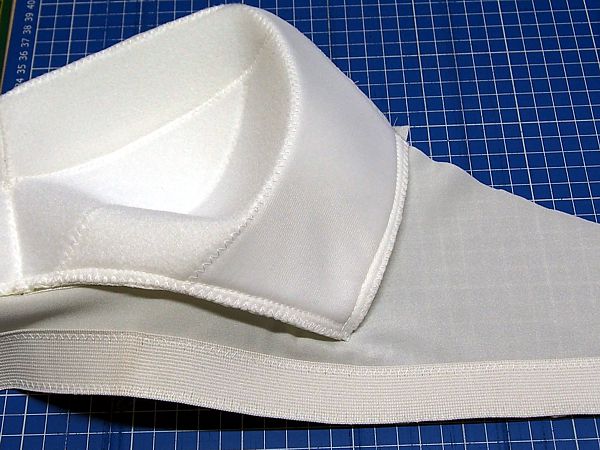
Attach The Side Boning

Place the boning casing onto the side seam. Overlap the bottom of the casing about 1 cm (3/8″) onto the lower edge elastic. Stitch the casing to the bra close to the inside (cup) edge of the boning casing, making sure your stitches are aligned with the previous stitching as much as possible. Do not stitch the other side of the boning casing. Bartack the bottom end of the casing closed using a small, narrow zigzag stitch.
Reinforce the wings by the extra elastics at sides! Read here how.
Make sure the bones are about 1cm (3/8″) shorter than the tunnel created by the casing. Use a file to round off the ends of the bones so they don’t poke through the casing. Push the bones into the casing.
Attach The Upper Edge Elastic

Attach the fold over elastic to the upper edge of the bra using a zigzag stitch. Stretch the elastic when sewing it to the wings and the underarm section of the cups, but not along the neckline edge.
The Back
Bra Back and Straps

Cut a 10-15 cm (4″ – 5 7/8″) length of strap elastic. (Check your pattern for the exact length.) Place the right side of the elastic against the wrong side of the wing. Position the elastic so the edge closest to the center back is about 3,5cm (1 3/8″) away from the center back.
Stitch the edges of the elastic to the wing using a small, narrow zigzag stitch.
Insert a ring through the strap elastic. Flip the end of the elastic onto the wrong side of the bra. Zigzag the elastic just below the ring. Trim the excess strap elastic along the lower edge close to the stitching.

Cut two more pieces of strap elastic, each about 50cm (20″) long. Loop one end of the elastic around the bar of a slide adjuster and sew to the strap using a narrow zigzag stitch (1).
Position the bra and elastic strap so the right side of the bra and wrong/plush side of the elastic are facing upward. Now thread the free end of the elastic strap though the ring sewn to the back wing (2), then back up through the slide adjuster (3).
Attach the free end of the elastic strap to the edge of the cup using a straight or narrow zigzag stitch.
For our model we placed the slide adjuster in the front.
Attach the back closure

Enclose the left side of the center back wing within the eye closure, and zigzag in place. To prevent fraying finish the edges of the closure using a zigzag stitch.
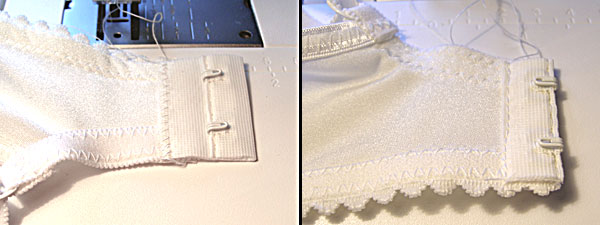
Open the hook closure. Position it so the foldline of the hook closure is even with the center back edge of the right wing. Sew in place using a zigzag stitch. Turn the bra around, fold the tape to the wrong side of the bra and sew in place with straight stitch. It helps to have the needle positioned as far right as possible. Using a zipper foot helps as well.